
To insert a checkbox in Microsoft Excel, select the cells and click Insert > Checkbox. Each cell gets a box that holds TRUE when ticked and FALSE when not, so formulas can count it. If your Excel has no Checkbox button, add a check box from the Developer tab and link it to a cell.
How to insert a checkbox in Excel
The easiest way to insert a checkbox in Excel is through the Insert tab. This method places checkboxes directly inside cells, making them useful for to-do lists, task trackers, attendance sheets, and other spreadsheets where you need to mark items as complete.
Here's how to add a checkbox in Excel:
1. Open your spreadsheet and select the cell where you want the checkbox to appear. To add several checkboxes at once, select a range of cells.
2. Go to the Insert tab on the ribbon.
3. Click Checkbox to insert a checkbox into each selected cell.
4. Click a checkbox to tick or untick it. You can also select the cell and press Space to change its state.
5. Save your spreadsheet to keep your changes.
Unlike older form controls, these checkboxes sit inside the cells themselves. You can select multiple cells and insert checkboxes across the entire range in one action.
Each checkbox also stores a Boolean value:
TRUE: The checkbox is ticked.
FALSE: The checkbox is unticked.
This matters because Excel formulas can use these values to calculate results automatically.
For example, if you have ten tasks with checkboxes in column B, you can use COUNTIF to count how many have been completed. You can also calculate the percentage of finished tasks or highlight completed rows.
Want to build spreadsheet checklists in the spreadsheet editor included with MobiOffice?
Which checkbox method does your Excel have?
Excel offers two main ways to insert checkboxes, depending on the version you're using. Newer versions with Insert > Checkbox support checkboxes inside cells, while versions without that option can use form controls from the Developer tab.
MobiSheets also offers an in-cell checkbox option.
If you don't see Checkbox on Excel's Insert tab, the Developer tab method provides another way to create an interactive checklist.
How to add a checkbox with the Developer tab
If your Excel version doesn't have Insert > Checkbox, you can add a check box using the Developer tab. This older method creates a form control that sits above the worksheet rather than inside a cell.
Step 1: Enable the Developer tab
The Developer tab may be hidden by default. To display it in Excel for Windows:
1. Open Excel and go to File > Options.
2. Select Customise Ribbon.
3. Under Main Tabs, check Developer.
4. Click OK.
The Developer tab should now appear on the ribbon.
Step 2: Insert a check box
1. Open the Developer tab.
2. Select Insert.
3. Under Form Controls, choose Check Box.
4. Click or drag on the worksheet to place the control.
5. Edit or remove the default label if you only need the checkbox.
You can copy the control to create additional checkboxes, although each one needs its own cell link if you want to track its value separately.
Step 3: Link the check box to a cell
Unlike in-cell checkboxes, form controls need a linked cell before formulas can read their state.
1. Right-click the check box.
2. Select Format Control.
3. Open the Control tab.
4. Enter a cell reference in Cell link, such as C2.
5. Click OK.
When you tick the checkbox, C2 displays TRUE. Unticking it changes the value to FALSE.
Repeat this for additional checkboxes, linking each one to a different cell.
You can hide the linked values in another column if you want to keep the checklist visually simple.
Turn checkboxes into a checklist that tracks itself
You can turn a basic checklist in Excel into a task tracker by combining checkboxes with COUNTIF formulas and conditional formatting. This lets you see how many tasks are finished, calculate your progress, and visually separate completed work from unfinished items.
Step 1: Create your checklist
Start with a simple table containing two columns:
Enter your tasks in column A and insert checkboxes into column B. For a longer list, you might have task names in A2:A20 and checkboxes in B2:B20
This approach works well for project planning, recurring administrative tasks, and many other everyday uses for spreadsheets.
Step 2: Count completed tasks
To count how many checkboxes are ticked, enter this formula in an empty cell:
=COUNTIF(B2:B20,TRUE)
COUNTIF checks the range B2:B20 and counts cells containing TRUE.
For example, if seven of your nineteen checkboxes are ticked, the formula returns 7. The result updates as you complete more tasks.
To calculate your completion percentage, use:
=COUNTIF(B2:B20,TRUE)/ROWS(B2:B20)
Format the result as a percentage.
If seven of nineteen tasks are complete, Excel displays approximately 37%.
Make sure every cell in the range represents a task. Otherwise, the percentage may include empty rows in its calculation.
Step 3: Highlight completed tasks
Conditional formatting can automatically change how a task appears when its checkbox is ticked.
1. Select the task range, such as A2:A20.
2. Go to Home > Conditional Formatting > New Rule.
3. Choose Use a formula to determine which cells to format.
4. Enter the formula =$B2=TRUE.
5. Click Format and select a grey font colour, strikethrough, or a light background.
6. Confirm the rule.
Now, when you tick a checkbox in column B, the corresponding row changes appearance.
You can also use alternate row colours to make longer task lists easier to scan.
Together, these features give you a checklist that tracks progress without requiring you to update totals manually.
Checkbox problems and how to fix them
Most Excel checkbox problems come from version differences, the way form controls are positioned, or missing cell links. The solution depends on which checkbox method you're using.
The Checkbox button is missing
If you can't find Checkbox under Insert, your Excel version or update channel may not support the in-cell feature yet. Check for available updates or use the Developer tab method instead.
Checkboxes move when you sort or resize cells
Form-control checkboxes float above the worksheet, so they may shift when you adjust rows, columns, or sorting.
Right-click the control, open Format Control, and check its positioning properties. Where available, select the option to move and size the object with its cells.
Alternatively, use in-cell checkboxes if your Excel version supports them.
COUNTIF doesn't recognise the checkbox
A form-control checkbox doesn't automatically store TRUE or FALSE in the cell underneath it.
Open Format Control and assign a Cell link. Then reference that linked cell in your formula. For in-cell checkboxes, use the checkbox cells directly.
The checklist formatting doesn't update
Check that your conditional formatting formula references the correct checkbox column.
For example, =$B2=TRUE works when the first task is in row 2 and the checkboxes are in column B. Also confirm that the rule applies to the intended range.
Alternative: MobiSheets
MobiSheets offers another way to create spreadsheet checklists without relying on Excel's Developer tab. It's part of MobiOffice, an affordable Microsoft Office alternative for working with documents, spreadsheets, and presentations.
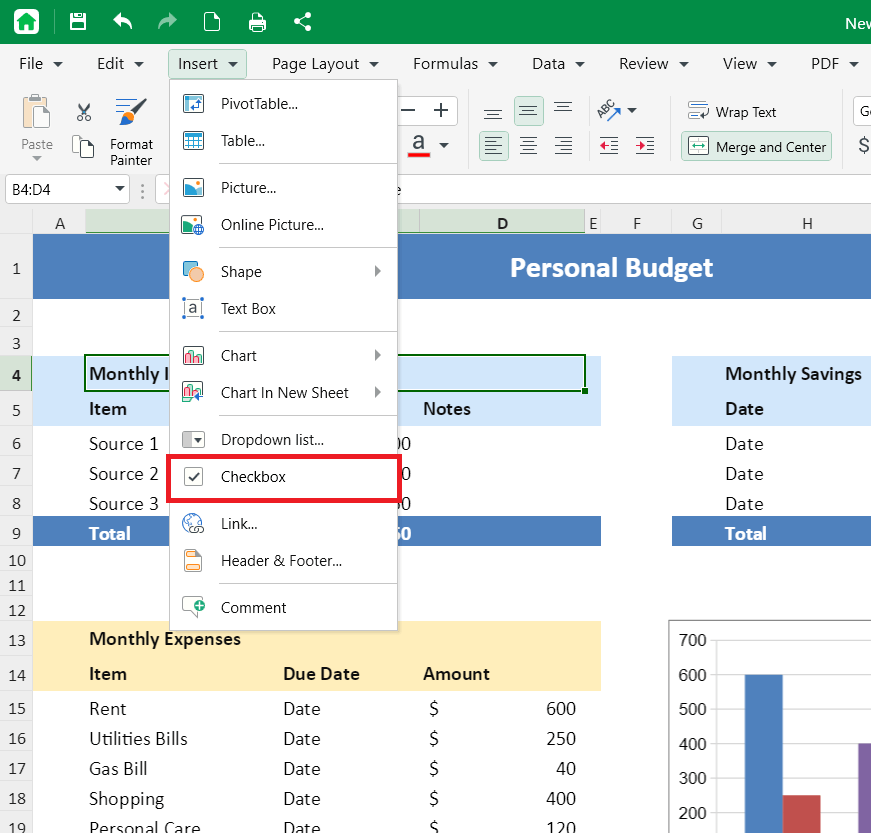
In MobiSheets for Windows, you can insert a clickable checkbox directly into a selected cell.
Here's how:
1. Open your spreadsheet in MobiSheets.
2. Select the cell where you want the checkbox.
3. Open the Insert menu.

4. Select Checkbox, located directly below Dropdown list….
5. Click the checkbox to mark or unmark the item.
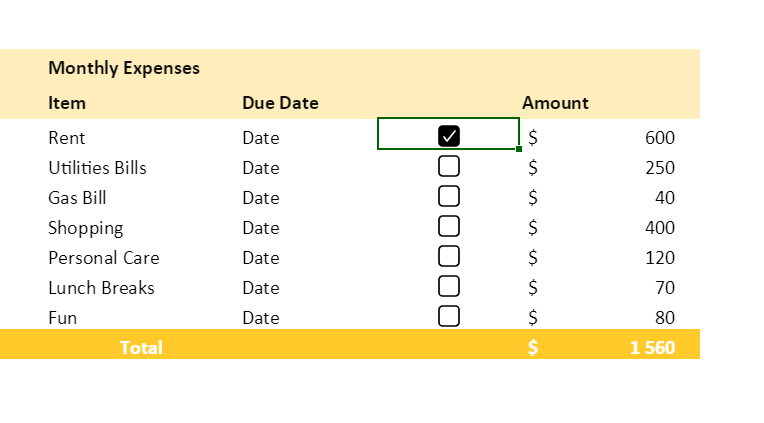
This makes it straightforward to create shopping lists, task trackers, and other checklists without adding separate form controls.
MobiSheets also supports spreadsheet editing and calculation tools. Its formulas and functions can help you organize and analyse spreadsheet data. MobiSheets opens and saves Excel files.
Want to see how the Insert menu works for you? Get the MobiOffice, which includes MobiSheets.
Frequently asked questions
Select the cells where you want the boxes and click Insert > Checkbox. Each cell gets a box you tick with a click or the Space key. A ticked box holds TRUE and an empty one holds FALSE. If you don’t see the button, use Developer > Insert > Form Controls instead.
Use Insert > Checkbox. Microsoft lists this in-cell feature for Excel for Microsoft 365 and Excel for Microsoft 365 for Mac. It needs no extra tab, no drawing and no cell link, because the box lives inside the cell and stores TRUE or FALSE on its own.
Your version or update channel does not have the feature yet. Microsoft lists Insert > Checkbox for Excel for Microsoft 365 on Windows and Mac. Until it appears, turn on the Developer tab and add a form control from Insert > Form Controls, then link it to a cell.
Use =COUNTIF(range,TRUE), for example =COUNTIF(B2:B20,TRUE). In-cell checkboxes work with this right away. A form control needs a linked cell first: right-click it, choose Format Control, set the Cell link, and point COUNTIF at the linked cells instead.
Put your tasks in one column and checkboxes in the next. Count the ticked ones with COUNTIF, divide by ROWS for a progress percentage, and add a conditional formatting rule such as =$B2=TRUE that strikes through and greys out finished rows.
In Excel, select the cells and press Delete. Empty boxes are removed; ticked boxes are cleared first, so press Delete again to remove them. To keep the TRUE/FALSE values without the boxes, use Home > Clear > Clear Formats. MobiSheets works the same way: select the cells and press Delete. Ticked boxes are cleared first, so press Delete again.
Final thoughts
Checkboxes turn a plain list into one you can tick off and track. If your Excel has Insert > Checkbox, use it: the boxes sit in the cells and work with COUNTIF right away. If not, the Developer tab still gets you there with a cell link per box. Add a counter, a progress percentage and a strike-through rule, and the list keeps score for you. The same approach works for a budget spreadsheet template where you tick off paid bills.
Ready to build your next checklist in MobiSheets? Get MobiOffice and try it on your own list.