

Tips for Mastering Spreadsheets
In this guide, you'll learn practical tips to work faster and more accurately in MobiSheets. These are small techniques you can use once you’re comfortable with the basics – from freezing headers to applying conditional formatting and using keyboard shortcuts. The steps start with Windows, followed by shorter sections for Mac, Android, and iOS.
Note: A few of the tips below — Format Painter, Conditional Formatting, Data Validation, Define Names, and converting a range to a Table — are Premium features. If you're on the Free plan, using them will prompt you to upgrade or start a trial.
Before you begin
Make sure you have:
MobiOffice installed on your device. See Installing MobiOffice on multiple devices.
A spreadsheet with data open in MobiSheets. See Creating and editing spreadsheets.
Signed in to MobiSheets. See Signing in to MobiSheets.
An internet connection, if you want to save to the cloud.
Freeze a row to keep headers in view
Freezing locks a row in place so it stays visible as you scroll through a large spreadsheet.
1. Click on a cell you want to freeze.
2. Open the View dropdown menu.
3. Click Freeze.
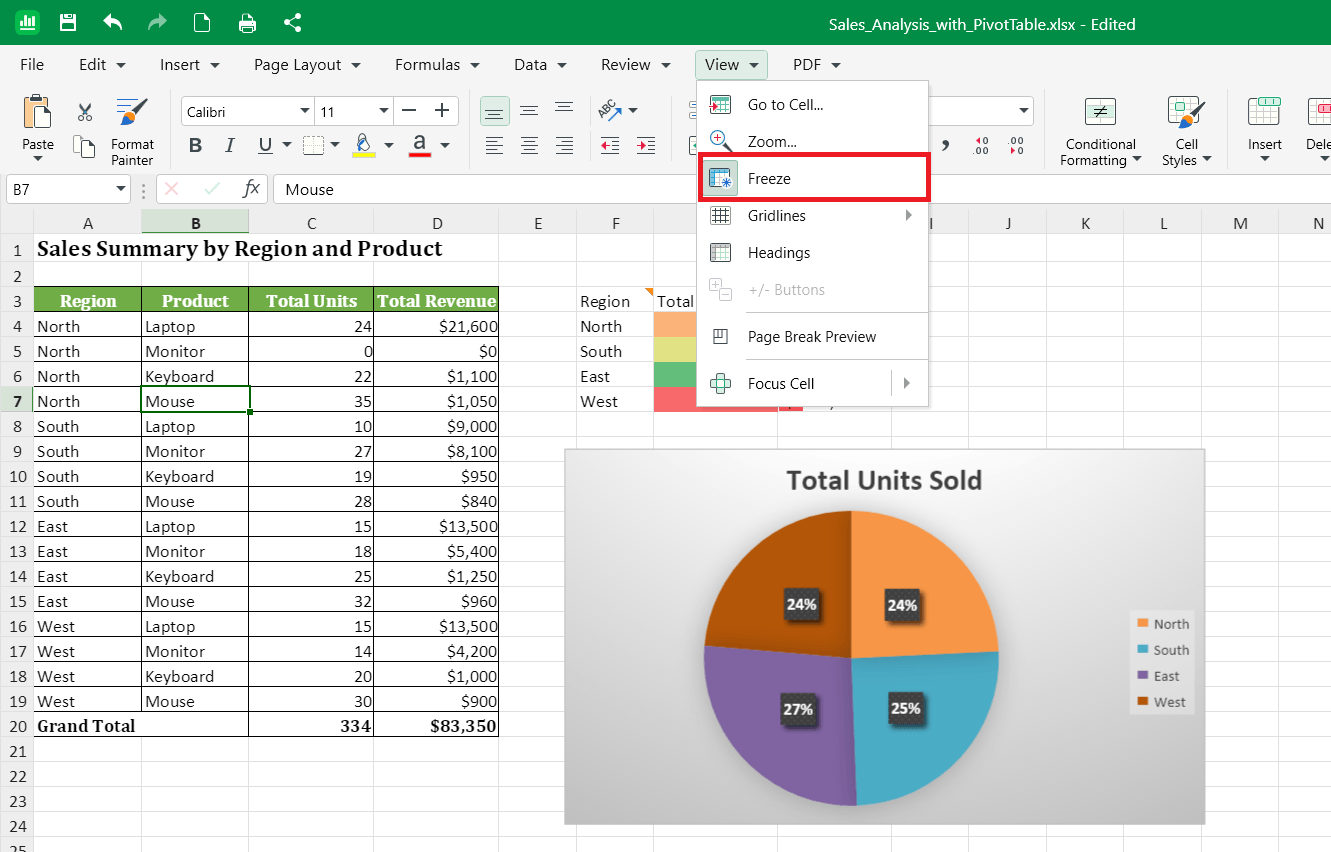
To unfreeze, open the View menu and click Freeze again.
Use keyboard shortcuts to work faster
Keyboard shortcuts save time on actions you do often.
Ctrl+S to save
Ctrl+Z to undo
Ctrl+Y to redo
Ctrl+C to copy
Ctrl+X to cut
Ctrl+V to paste
Ctrl+F to find
Ctrl+H to find and replace
Ctrl+A to select all
Ctrl+B, Ctrl+I, Ctrl+U to apply bold, italic, or underline
For the full list, see Shortcuts in MobiSheets.
Reuse formatting with Format Painter
Instead of formatting cells one at a time, copy the look from one cell to another.
1. Select a cell that has the formatting you want.
2. In the ribbon, click Format Painter.
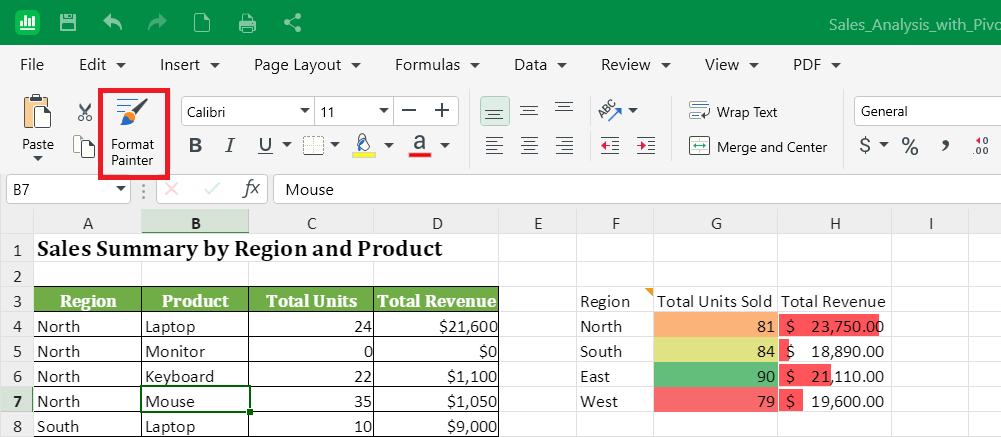
3. Select the cells you want to format.
The font, color, number format, and borders all transfer in one step.
Highlight values with conditional formatting
Conditional formatting changes a cell's appearance based on its value, so important numbers stand out without you needing to scan every row.
1. Select the cells you want to format.
2. In the ribbon, open Conditional Formatting.
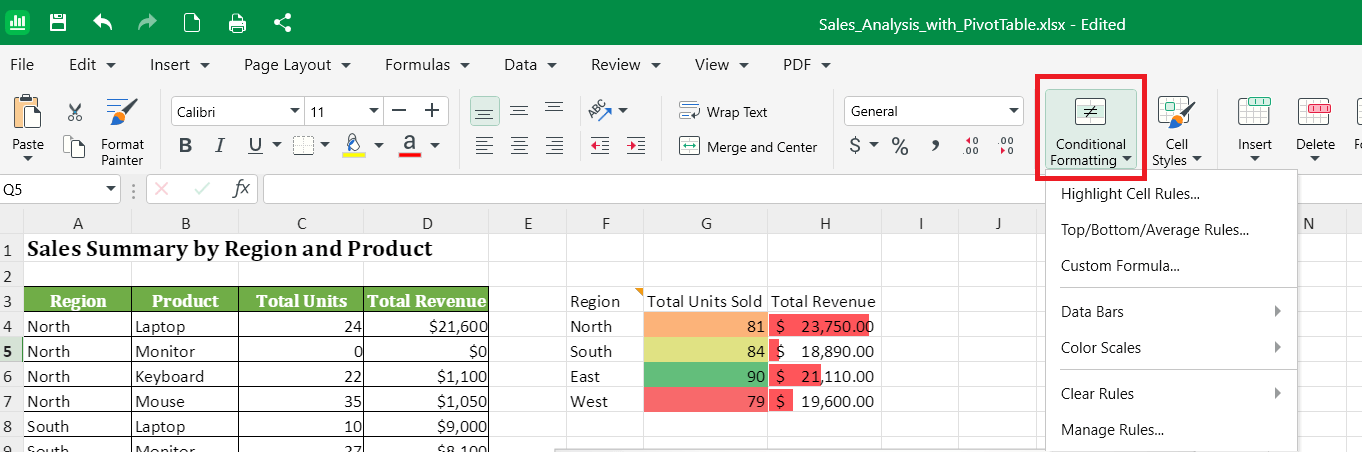
3. Choose a rule, such as:
Color Scales to shade cells with a color gradient based on their value.
Highlight Cell Rules to highlight values that meet a condition, such as greater than a set number.
Data Bars to add bars inside cells, sized by value.
4. Set your value or style, then confirm.
Control what users can type with data validation
Data validation limits what can be entered in a cell, which helps keep your data clean.
1. Select the cell or range.
2. Open the Data tab.
3. Click Data Validation.
4. Choose what to allow, such as:
A list of values for a drop-down menu.
A number within a range.
A specific date range.
5. Confirm.
A drop-down arrow appears on each cell, so users pick from your list instead of typing.
Label key ranges with Define Names
Naming a range makes formulas easier to read. For example, =SUM(Sales) is clearer than =SUM(B2:B25).
1. Select the range you want to name.
2. Open the Formulas dropdown menu.
3. Click Define Names.
4. Type a short, clear name, such as Sales or Q1Revenue.
5. Confirm.
You can now use that name in any formula in the spreadsheet.
Fill data quickly
Use the fill handle to repeat or extend data in seconds.
1. Type a value in the first cell, such as a date, number, or weekday.
2. Select the cell.
3. Drag the small square at the bottom-right corner down or across.
MobiSheets continues the series automatically. For example, Jan fills out to Feb, Mar, Apr, and so on.
Note: The first two cells must be filled to fill a numerical series (ex. 1, 2, 3, etc.).
Organize work across multiple sheets
Use sheets within one file to keep related data together without crowding a single grid.
1. At the bottom of the workbook, click the + button to add a new sheet.
2. Double-click a sheet tab to rename it, such as Q1, Q2, or Summary.
3. Right-click a sheet tab for options to Move, Copy, Delete, or change the tab color.
Tip: To pull a value from another sheet into a formula, use the sheet name and an exclamation mark, such as =Q1!B5.
Find and replace across a spreadsheet
When you need to update the same word or value in many cells, use Find and Replace instead of editing each one.
1. Press Ctrl+H to open Find and Replace.
2. In the Find tab, type what you want to change.
3. In the Replace tab, find what you want to change then type the new value.
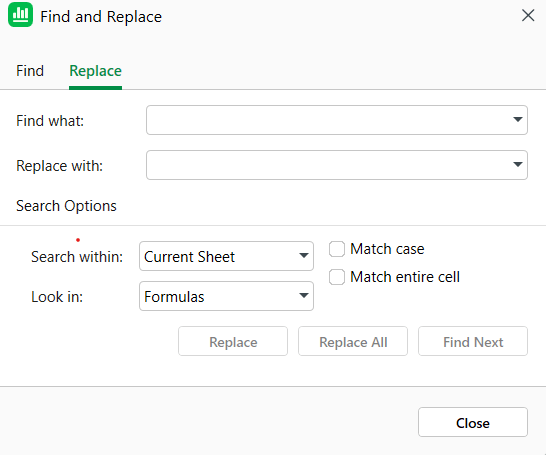
4. Click Replace All or click Replace to update one at a time.
Write smarter formulas
Small habits make formulas easier to write, reuse, and debug.
Lock a cell reference with $. When you copy a formula, references shift with each row or column. Add a $ to keep a reference fixed. For example, =A2*$B$1 always multiplies by cell B1, no matter where you copy the formula.
Use AutoSum for quick totals. From the ribbon, click the AutoSum icon then choose Auto Sum dropdown. Alternatively, on the Formulas tab, click AutoSum and choose Sum, Average, Count, Min, Max, or Median instead of typing the function.
Combine functions with IF. Use IF to check a condition before calculating. For example, =IF(B2>100,"Over","Under") labels each row based on its value.
Use SUMIF and COUNTIF to total only what matches. For example, =SUMIF(A:A,"Sales",B:B) adds the values in column B where column A says Sales.
Watch for error codes. #DIV/0!, #NAME?, and #REF! each point to a different issue. See Using formulas and functions for what they mean.
Prepare data for tables and pivot tables
Clean source data is the difference between a pivot table that just works and one that won't build.
Keep one header row. Put your column names in a single row at the top. Don't use merged cells or two-row headers.
No blank rows or columns inside your data. When a single cell is selected and the range is automatically detected, a pivot table reads to the first empty row or column and stops. Delete blanks or move stray data out. When a user manually selects the full range before inserting a pivot table, blanks are ignored and the rest of the data is included.
Keep one type of value per column. If a column has numbers, don't mix in text like "n/a". Use a blank cell or 0 instead.
Use a table for changing data. Convert your range to a table with Insert > Table so new rows are picked up automatically when you refresh a pivot table built from it. (Insert > Table is a Premium feature. Free plan users will see an upgrade or trial prompt.)
For the full steps, see Inserting regular and pivot tables.
Build a spreadsheet that's easy to update
A few habits make a spreadsheet easier to maintain weeks or months later.
Name your file before you start. Save with a clear name like 2026-Q1-Budget instead of leaving it as Book1.
Save often with Ctrl+S. MobiSheets keeps your changes locally and, if you save to MobiDrive, on your other devices too.
Use one cell per value. Keep numbers and labels in separate cells so you can sort, filter, and calculate on them.
Add comments instead of editing data. Right-click a cell and add a comment to leave a note for yourself or your team without changing the value.
Freeze your header row as soon as your data grows past one screen, so you always know which column is which.
Tips on Mac
Use Cmd instead of Ctrl for shortcuts, such as Cmd+S to save and Cmd+Z to undo.
Freeze a row from the View menu.
Format Painter, Conditional Formatting, Data Validation, and Define Names are available the same way as on Windows.
Format Painter, Conditional Formatting, Data Validation, and Define Names work the same way as on Windows, including the same Premium requirement.
Tips on Android and iOS
On phones and tablets, MobiSheets is part of the MobiOffice app.
Tap and hold a cell to copy, cut, or paste.
Use Freeze from the view options to lock a row.
Apply conditional formatting and data validation from the formatting options on the toolbar.
Troubleshooting
A keyboard shortcut isn't working. Check that the spreadsheet has focus. Click into the sheet first, then try the shortcut again.
My conditional formatting didn't apply. Make sure you selected the cells before opening the menu, and that the cells contain the type of value the rule expects (such as numbers for Highlight Cell Rules > greater than).
My data validation drop-down isn't showing. Click a cell that's part of the validated range to see the drop-down arrow. Cells outside the range won't show it.
My pivot table won't refresh with new rows. Pivot tables built from a fixed range won't pick up rows added below. Convert your source data to a table first, then build the pivot table from the table.
Format Painter, Define Names, or Insert Table won't open. Confirm you're on a Premium plan or an active trial — these aren't available on Free.


