Need to organize your data in Excel for financial analysis, budgeting, exam prep, or keeping on track?
Adding columns in Excel is a smart and simple way to expand your data while keeping everything in order. Whether you’re summing up numbers or inserting new data, mastering how to add columns in Excel will streamline your work.
At some point in time, you’ve probably wondered why adding columns in Excel is so important. Well, for starters, this feature allows you to edit and present your data with ease.
Whether you’re working on a financial model, a report to track your productivity at work, or searching for trends, inserting columns helps you keep everything organized and accessible.
Here’s why this Excel function is important as it:
Creates space for new information as your data grows.
Rearranges existing columns more logically for better readability.
Categorizes data points for clearer analysis.
Presents information so your data is easy to understand.
As one of the most common and useful tasks in Excel, there are various ways to add columns, from simple right-clicks to advanced VBA macros.
In this article, we’ll help you discover and master the best methods, so you can streamline your work and keep your data sorted.
How to insert columns using the right-click method
Sometimes the simplest solutions are the most effective, and that’s certainly true for the right-click technique in Excel. Whether using a mouse or a laptop touchpad, this method is quick and easy (and can save you so much time).
To add columns in Excel with the right-click method:
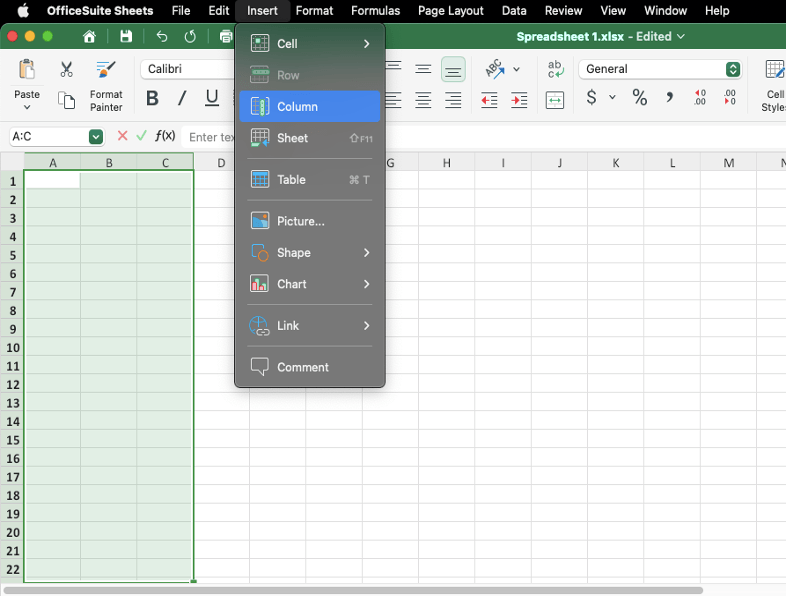
Open Microsoft Excel (or your preferred spreadsheet tool like MobiSheets).
Select a column. Choose the column immediately to the right of where you want the new column to appear. You can do this by clicking the column letter at the top. Alternatively, right-click any cell within that column.
Right-click your selection or anywhere in the highlighted area to bring up the context menu.
Click the “Insert” option from the drop-down menu.
Select “Insert Columns” (or “Entire column” in MobiSheets) to add a new column to the left of your selection. Your existing columns will automatically shift to the right, making room for the new one you’ve just created.

And that’s it! A new column will appear to the left of your selected column, ready for you to input data.
Four more tips on adding columns via the right-click method
When you insert a column in Excel, you’ll notice an “Insert Options” button next to the newly added column. This button allows you to select the formatting of the newly inserted column, which can be “Format Same As Left”, “Format Same as Right”, or “Clear Formatting” (to remove all font styles, borders, and background colors from the inserted column).
If you need to add multiple columns in Excel at once, simply select the same number of adjacent columns as you want to insert, right-click within your selection, and choose “Insert Columns”. The new columns will immediately appear left of the columns you’ve highlighted.
To delete columns, just select them, right-click, and choose “Delete”. The remaining columns will automatically shift to the left.

Use a keyboard shortcut to speed up the process. Highlight the same number of columns you want to add by selecting adjacent cells in a row and pressing “Ctrl” and “Space”. Then, press ‘Ctrl,’ ‘Shift,’ and ‘+’ on the main keyboard (or ‘Ctrl’ and ‘+’ on the numeric keypad) simultaneously to insert a new column instantly after highlighting the desired columns. If needed, select “F4” or “Ctrl” and “Y” to repeat the action and add more columns.
How to insert columns via the “Home” Tab
Excel’s “Home” tab is your go-to for quick data manipulation, offering easy access to functions and formulas. You can use it to insert one or multiple columns simultaneously with just a few clicks.
Here’s how to add columns using the “Home” tab:
Open the Microsoft Excel file.
Choose the column or columns where you want to add new ones. Remember, Excel adds columns to the left of your selection.
With your columns selected, locate the “Home” tab at the top of the Excel interface. It’s positioned right at the front of the tab bar for easy access.
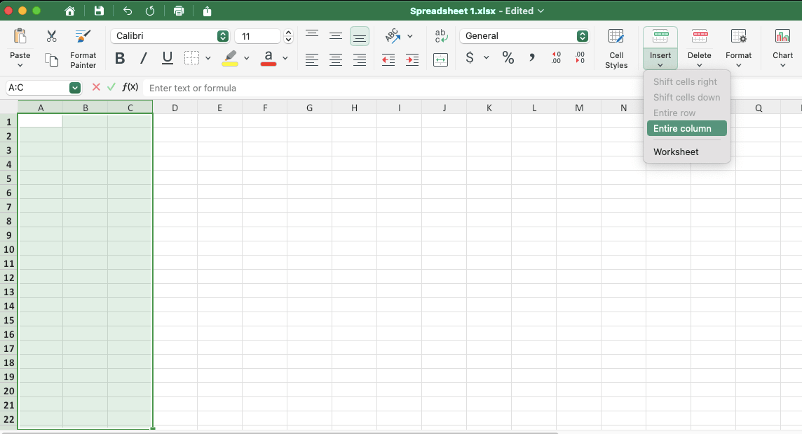
Once the “Home” tab is selected, click the “Insert” button. This will immediately add a new column to the left of your selection. You can also click the small arrow next to “Insert” for more options and select “Insert Sheet Columns” to manually insert a column.


What if you need to remove a column?
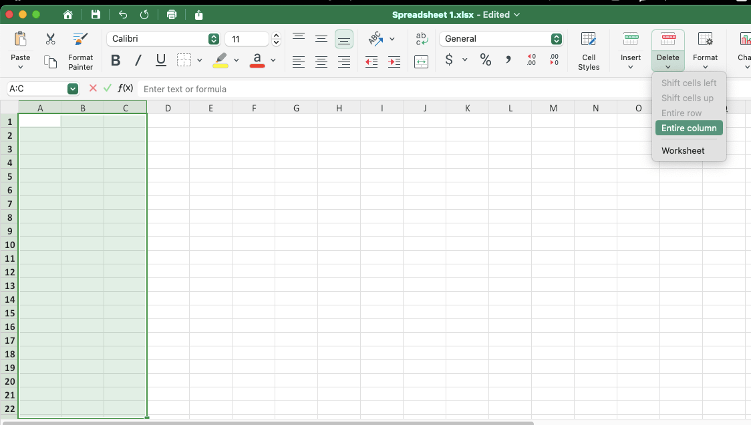
In that case, select the column(s) you want to delete, go back to the “Home” tab, and click “Delete.” Excel will automatically remove the column (or columns) and shift the remaining ones to the left.

How to add multiple non-adjacent columns
Adding non-adjacent columns isn’t as tricky as it seems – all you need to do is follow these quick steps:
Select the non-adjacent columns. Hold down “Ctrl” while clicking on the letters of the columns you want to select. This will allow you to choose several columns that aren’t next to each other.
Insert new columns by either pressing a keyboard shortcut (“Ctrl”, “Shift”, and “+”) or right-clicking your selection and choosing “Insert” from the dropdown menu. You will thus add a new column to the left of each selected column.

Now that we’ve covered the basics of adding columns in Excel, let’s look at three more complex methods to do so.
How to insert columns in an Excel Table
An Excel Table is an object or a structured range of data that helps you manage and analyze your information, independently of the rest of the worksheet. To add columns within an Excel Table, follow these steps:
Click on any cell in the column next to where you want to insert a new column.
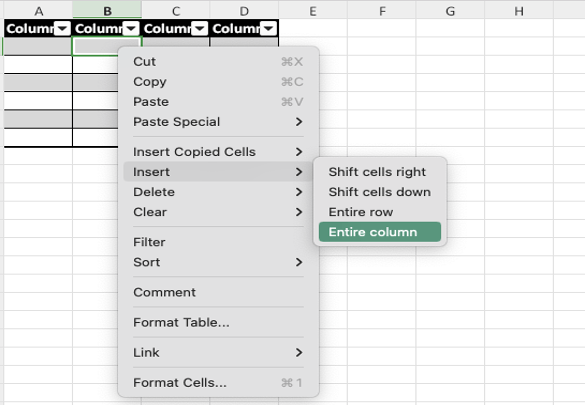
Insert a new column. Right-click the selected cell, then choose “Table Columns to the Left” (or “Insert Table Columns to the Left” or “Insert Table Columns to the Right”; in case you’re using MobiSheets, select “Insert”, then “Entire column”) from the context menu.

A new column, named by default as “Column1”, will be added. You can rename this column to better suit your data.
How to add columns via the “drag-and-drop” method
Use the “drag-and-drop” technique to quickly swap and rearrange your columns. Hint: this method requires a very smart keyboard shortcut.
Click on the header of any blank column in your sheet to select it.
Hover your cursor over the edge of the selected column until it changes to a four-sided arrow, signaling that the column is ready to be “dragged and dropped”.

Hold down the “Shift” key on your keyboard, then drag the column to the desired location. As you move the column, a green vertical line will appear, showing the column’s new location, once you release the mouse button.
Release the mouse button to place the column in its new location.

Can you automatically insert columns to the right?
Yes, by now you’ve probably figured out, via this article, how the traditional method of adding columns to the left works. But, if you want to insert columns to the right, this certainly isn’t mission impossible; all you need is the “Fill Handle” feature.
Select the target column(s).
Locate the “Fill Handle”. With the column selected, find the small green square in the top-right corner, known as the “Fill Handle.”
Hover your cursor over the “Fill Handle”, then press and hold the “Shift” key. The cursor will change to a two-bar icon with arrows, showing that you can insert a column(s).
Left-click and drag the “Fill Handle” to the right, while still holding “Shift,” to create as many new columns as you need.
VBA code to automatically insert a blank column after every column
If you want to automatically insert a blank column between every existing column in your worksheet, you can use VBA code to streamline the process. Here’s how to set it up:
Open the Visual Basic Editor. In Excel, press “Alt” and “F11” to open the Visual Basic for Applications (VBA) Editor.
Insert a New Module. In the VBA Editor, right-click on your workbook name in the “Project-VBAProject” pane on the left. Add a new module by selecting “Insert -> Module” from the context menu.
Add the VBA Code. Copy the VBA code below and paste it into the new module window (“Module1”):
Sub InsertBlankColumns()
Dim ws As Worksheet
Dim lastCol As Long
Dim i As Long
‘ Set the worksheet you want to work on
Set ws = ThisWorkbook.Sheets(“Sheet1”)
‘ Find the last used column in the sheet
lastCol = ws.Cells(1, ws.Columns.Count).End(xlToLeft).Column
‘ Loop through columns from the last to the first
For i = lastCol To 1 Step -1
ws.Columns(i + 1).Insert Shift:=xlToRight
Next i
End Sub
Sub InsertEveryOtherColumn()
Dim colNo, colStart, colFinish, colStep As Long
Dim rng2Insert As Range
colStep = -1
colStart = Application.Selection.Cells(1, 1).Column + 1
colFinish = Application.Selection.Columns.Count + colStart – 1
Application.ScreenUpdating = False
Application.Calculation = xlCalculationManual
For colNo = colFinish To colStart Step colStep
ActiveSheet.Cells(1, colNo).EntireColumn.Insert
Next
Application.ScreenUpdating = True
Application.Calculation = xlCalculationAutomatic
End Sub
Save Your Workbook as an “Excel macro-enabled workbook” (*.xlsm) to ensure the macro is saved.
Close the VBA Editor via “Alt” and “Q” and return to your workbook.
Run the Macro. Select the range in your worksheet where you want to insert columns. Press “Alt” and “F8” to open the Macro dialog box, select “InsertEveryOtherColumn”, and click “Run”.
The macro will automatically insert a blank column after every existing column in the selected range, making it easy to organize your data with evenly spaced columns.
Don’t forget to do this before you add columns in Excel
Ready to start organizing your report with columns in Excel? Not so fast!
Before you dive in, here are three quick tips to help keep your data perfectly organized:
If you need to reverse any recent changes, simply press “Ctrl” and “Z” to undo the last action. Alternatively, click the backward-facing arrow at the top of your screen to undo.

Save a copy of your original spreadsheet on your computer, to keep it intact while you make changes to a new copy, while you make changes to a new copy.
In addition to adding columns, remember that you can also insert single and multiple rows and individual or several cells.

And if you’re ever feeling overwhelmed by Excel’s complexity, there’s a faster, simpler way to manage your data with MobiSheets.


