Editing a digitally signed PDF document can be a bit tricky since the signature serves as a way to ensure that the document has not been tampered with. But while you cannot really edit such files in the true sense of the word, there are still ways in which you can interact with them without invalidating the original signature. Join us as we take a close look at all the things you can (and cannot) do with digitally signed files using MobiPDF. But before we jump right in…
What is a digitally signed PDF document?
Digital signatures are one of the most popular methods to secure a file, and for a good reason as they are notoriously difficult to forge. Because of this, their validity has long been acknowledged by governments and law firms across the world. Digital signatures are incredibly useful for two main reasons: they confirm the identity of the person who signed the document and act as an insurance policy in case someone tries to alter the PDF’s contents.
In more practical terms, this means that if you were to open a digitally signed PDF right now, you would find that all editing features within your editing software of choice would be grayed out, like so:

And even if you somehow manage to outsmart the software and edit a signed PDF, you will irreversibly invalidate the signature, letting others know that the file has been tampered with and that the information it contains is no longer trustworthy.
So, what can you do if you are handed a digitally signed document?
Viewing works, and so does printing
Probably goes without saying, but you can still search through a document as easily as you would a normal PDF. All reading modes are also freely accessible, with the only thing missing being the ability to PDF bookmark pages for later reference. And if you want to edit texts directly, you can always print out the PDF file and adopt the good ol’ pen and paper approach. You could then take your improvised draft and discuss it at length at your next team meeting.
You can add custom digital signatures
In some cases, a file might need to be digitally signed by multiple parties, for instance when approving a standard operating procedure document. If that’s the case and you are one of the persons on this list, don’t fret as with MobiPDF you can still digitally sign the document even if you don’t have permission to edit it.
Alright, so how to sign a PDF that is already signed? All you have to do is follow these three simple steps:
1. Go to Protect → Digitally Sign.

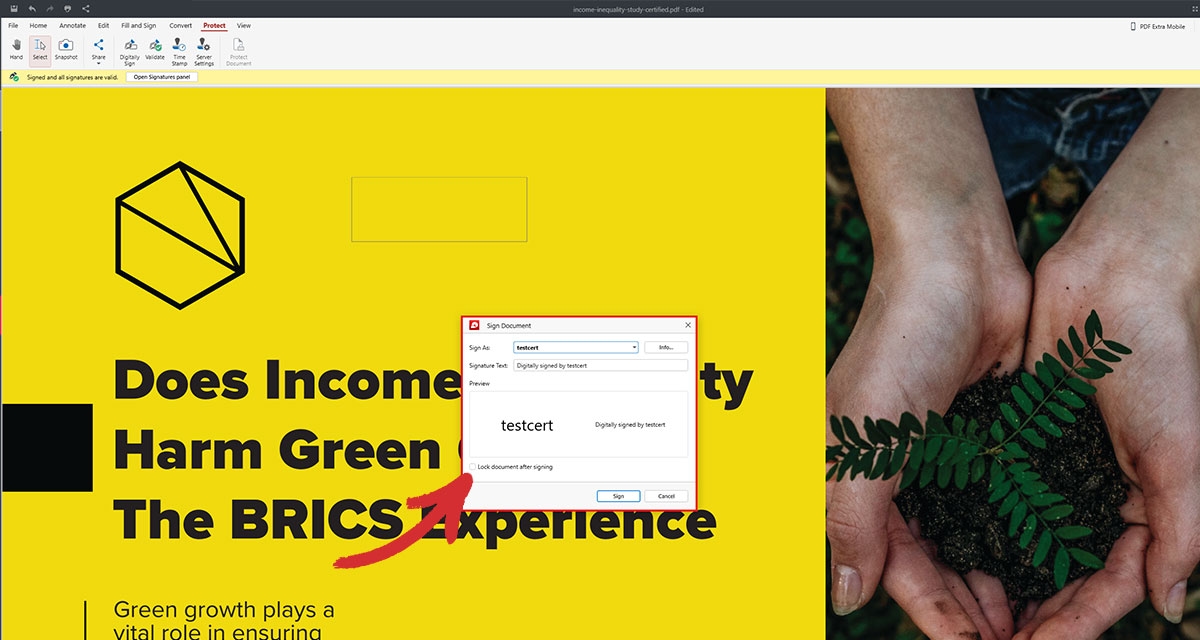
2. Add a signature box to the PDF at the spot where you want to place your digital signature, as shown below.

3. Choose your signature from the dropdown menu and click Sign.
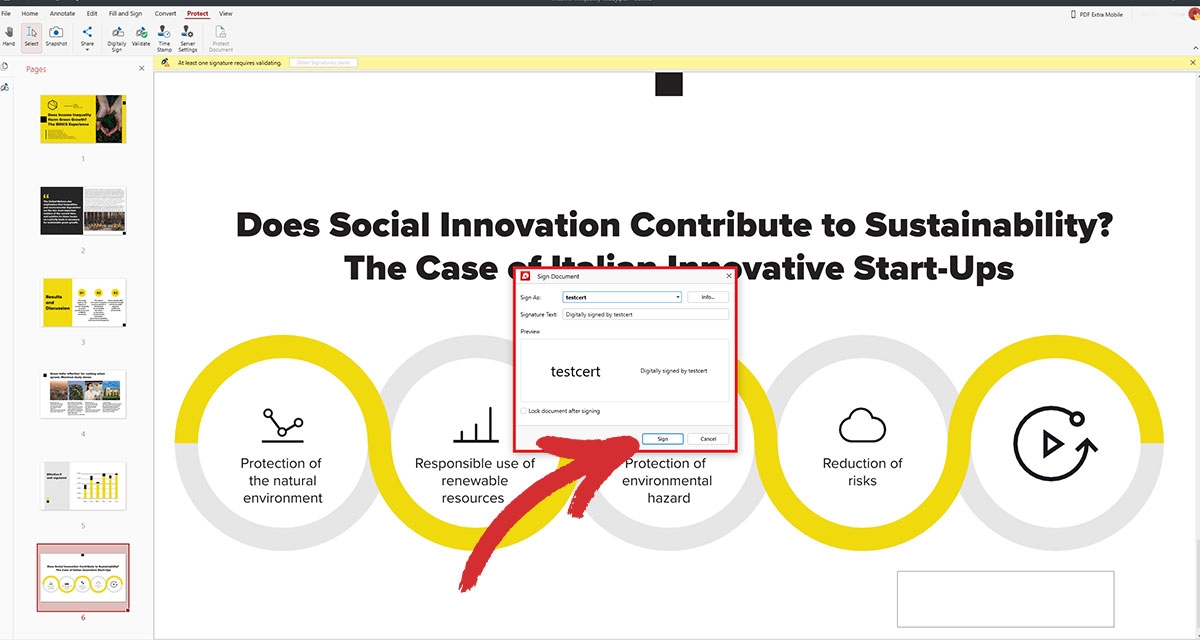
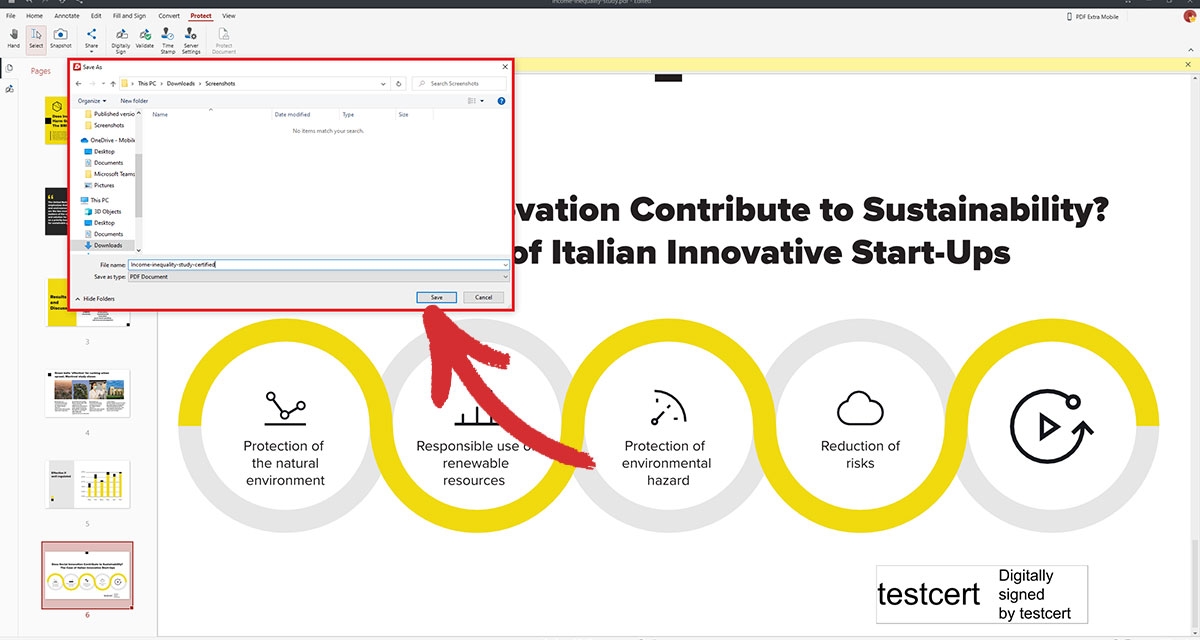
You will be then prompted to save the PDF as a new file. This is done to avoid accidental overwrites, but since you’re just one of the many parties signing this document, you could overwrite the original.
Collaboration is still a viable option
Just because editing functionalities are off the table with digitally signed documents doesn’t mean that you can’t freely collaborate with your colleagues on a project. With MobiPDF, for instance, you can still leave comments, highlight texts in custom colors, take snapshots, insert text boxes, add rectangles and other geometric shapes, and even include pre-made stamps, such as Void, Approved, or For Public Release.
Finally, you can also attach files to a PDF. This includes various images or even other PDF files in case you want to send over relevant supportive material or clarify something in more detail, without having to write a comment the size of a mini novel.
You can convert to other file formats
If for some reason you need to transform a digitally signed PDF to any other popular file format, such as Word or a JPEG, MobiPDF has you covered. Once you’ve opened your file, simply head to the “Convert” tab, where you will be presented with the options to export a PDF to Word, Excel, Epub, or as an image (both JPEG and PNG are supported). When the conversion is done, you’ll find that everything is just as you remember it – stylish and perfectly formatted.
How to edit a digitally signed PDF document as the owner?
Sometimes, you may need to go back to a PDF that you have previously signed and make some quick changes. This, however, can only happen if the digital signature is completely erased from the file. Luckily, since you’re the owner of the signature, you also have permission to remove it and unlock the full editing capabilities of MobiPDF.
1. Open the document that you want to change.
2. Go to View → Digital Signatures.

Alternatively, you can also click the Open Signatures Panel button next to the pop-up message Signed and all signatures are valid which will appear upon opening the document.

3. On your left, you should now see a list of all digital signatures contained within your document.
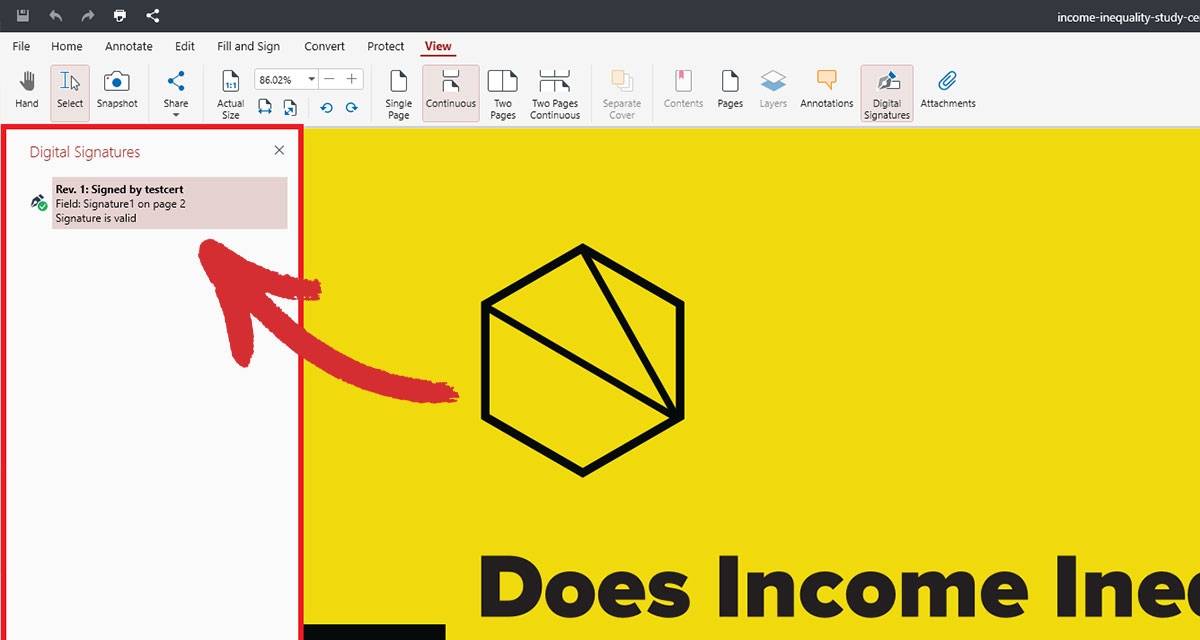
4. Right-click your signature and choose Clear Signature.
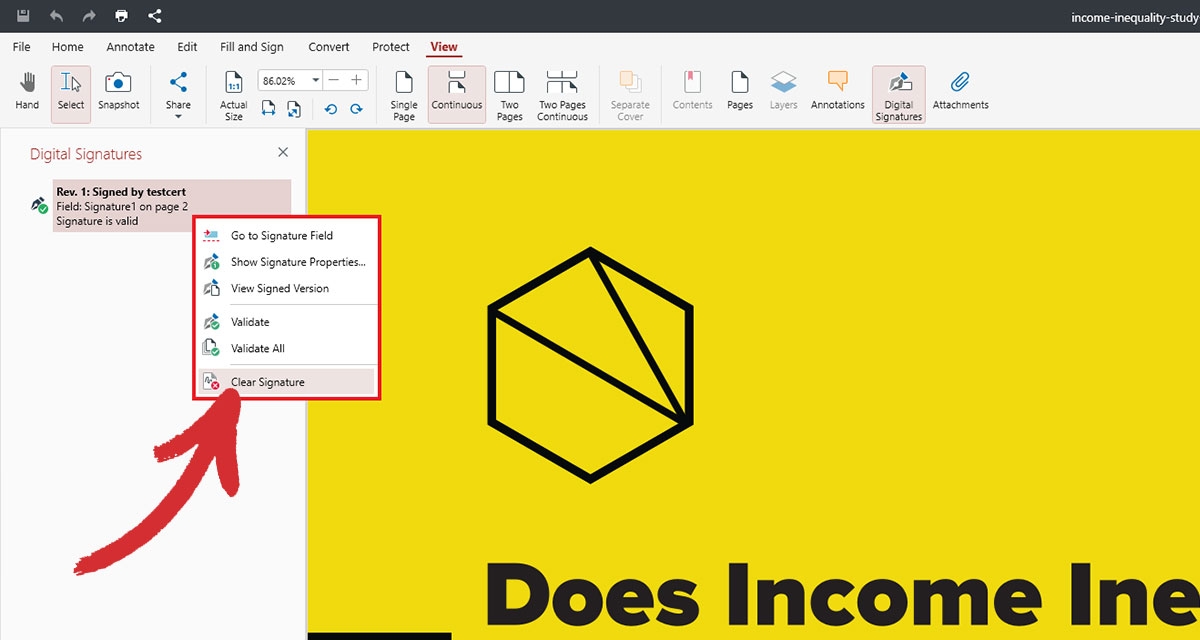
You’re all set – now you can make any and all changes to your document as if it’s never been digitally signed to begin with!
Additional recommendations and tips
There are a few more things you’ll need to keep in mind if you ever need to work with digitally signed PDFs.
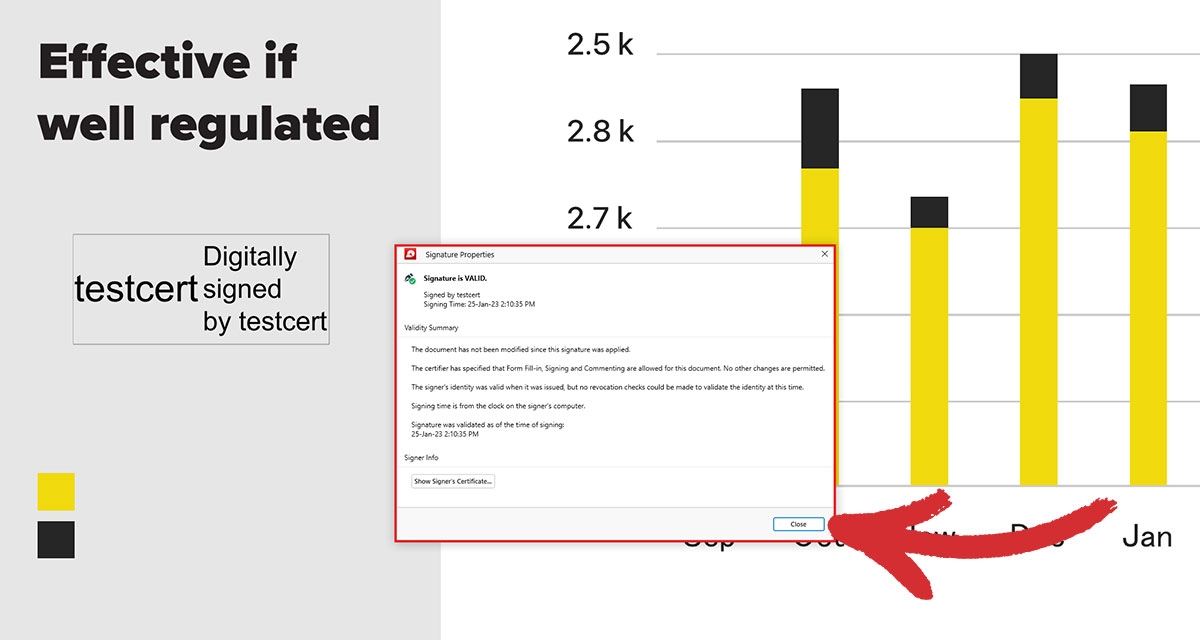
Digital signatures will typically display the name of the person who signed the document. However, you can access additional information about the signature and its owner by double-clicking the rectangle surrounding the text. This will open a separate window containing the signer’s name, email address, the time at which the PDF was signed, the permissions other users have when viewing this document, as well as the digital signature’s current state: VALID or INVALID.
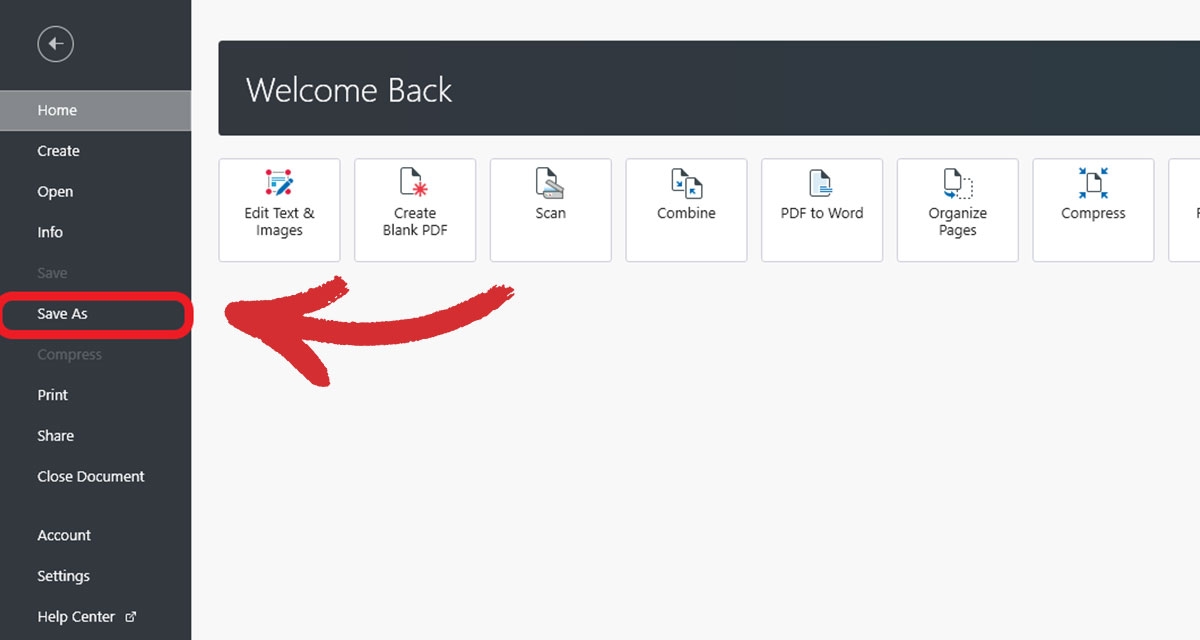
If you are signing the document yourself, a good rule of thumb is to always save your certified PDF as a new file and under a slightly different name through the Save As menu. This will ensure that you won’t accidentally overwrite the original file with the certified version and thus lose your PDF editing privileges. You also won’t have to delete your signature each time you want to make changes to your document.
If you want others to only have permission to view your PDF, you can enable the Lock document after signing option before placing your digital signature. In this case, creating a copy of your document is extra mandatory since turning this feature on will render your document read-only for everyone, including yourself.
If you want to make extensive changes to a file signed by someone else or annotate, sign, or convert a locked (read-only) file, your best option to edit a digitally signed PDF is to contact the person who signed it and request the signature to be removed, receive an unsigned copy of the file, or to have them send you the certificate containing the actual digital signature which you could then use to gain full permissions.
Optimize your PDF workflow today: download the desktop app today and try out all of its features with our 14-day trial or test the waters with our free and capable web converter.
